 Save
Save I discovered mason jar meals on a hectic Tuesday when my lunch plans fell apart and I had nothing packed. Standing in my kitchen with handfuls of leftover vegetables and some cooked chicken, I started layering things into a jar on pure instinct—sauce first, protein next, then all the colorful vegetables and noodles on top. Twenty minutes later, I poured hot water over it at my desk and realized I'd accidentally invented something brilliant. Now these jars have become my secret weapon for staying fed when life gets chaotic.
My coworker Marcus watched me shake a mason jar at my desk one day and asked if I was making a cocktail. When I opened it to show him the perfectly softened noodles and still-crisp vegetables, he demanded the recipe immediately. A week later, his whole team was doing the same thing, and suddenly our office kitchen had a small fleet of mason jars lined up in the fridge. That's when I knew this wasn't just convenient—it was genuinely good enough to share.
Ingredients
- Dried ramen or rice noodles (200 g): Ramen cooks faster and has better texture, but rice noodles work beautifully if you're avoiding wheat.
- Cooked chicken breast, tofu, or shrimp (200 g, diced): Use whatever protein you have—rotisserie chicken saves serious time, and firm tofu actually gets better flavor when it sits in sauce overnight.
- Shredded carrots (1 cup): They stay crunchy longer than you'd expect, and their sweetness balances the salty sauce perfectly.
- Thinly sliced bell peppers (1 cup, red or yellow): Slice them thin so they soften slightly without turning mushy, and yellow peppers add a subtle sweetness.
- Baby spinach or kale (1 cup): Kale actually improves over a few days in the jar—it gets tender but doesn't wilt into nothing like spinach might.
- Thinly sliced scallions (1/2 cup): They pickle slightly in the sauce, which is exactly what you want for flavor.
- Bean sprouts (1/2 cup): Add these right before eating if you want maximum crunch, or layer them early if you prefer them softer.
- Soy sauce (4 tbsp): Use tamari if gluten is a concern—the flavor is identical and it won't break your dietary needs.
- Rice vinegar (2 tbsp): This is what keeps the vegetables tasting fresh instead of pickled; don't skip it.
- Sesame oil (2 tbsp): Toast flavor matters here, so buy the dark kind and store it in a cool spot so it stays fragrant.
- Honey or maple syrup (1 tbsp): This rounds out the sauce and keeps everything from tasting one-note and salty.
- Sriracha or chili sauce (2 tsp, optional): Start with less than you think you need—it gets spicier as the jar sits.
- Minced garlic and grated fresh ginger (1 clove and 1 tsp): Fresh is non-negotiable here; garlic powder and ground ginger taste like an afterthought by comparison.
- Cilantro, roasted nuts, sesame seeds, and lime wedges (for toppings): Save these for when you open the jar—they're your texture and brightness insurance.
Tired of Takeout? 🥡
Get 10 meals you can make faster than delivery arrives. Seriously.
One email. No spam. Unsubscribe anytime.
Instructions
- Cook and chill the noodles:
- Bring a large pot of water to a rolling boil and cook your noodles according to the package, but pull them out a minute early—they'll soften more when the hot water hits them in the jar later. Drain them and rinse under cold water, shaking the colander to remove excess moisture, then spread them on a plate to cool completely.
- Whisk together your sauce:
- In a small bowl, combine soy sauce, rice vinegar, sesame oil, honey, garlic, ginger, and Sriracha if you're using it. Whisk until the honey dissolves and everything looks cohesive—this takes about a minute of proper whisking, not just stirring.
- Divide the sauce among jars:
- Pour about 2 tablespoons of sauce into the bottom of each large mason jar. This acts as both seasoning and a protective layer for the vegetables above it.
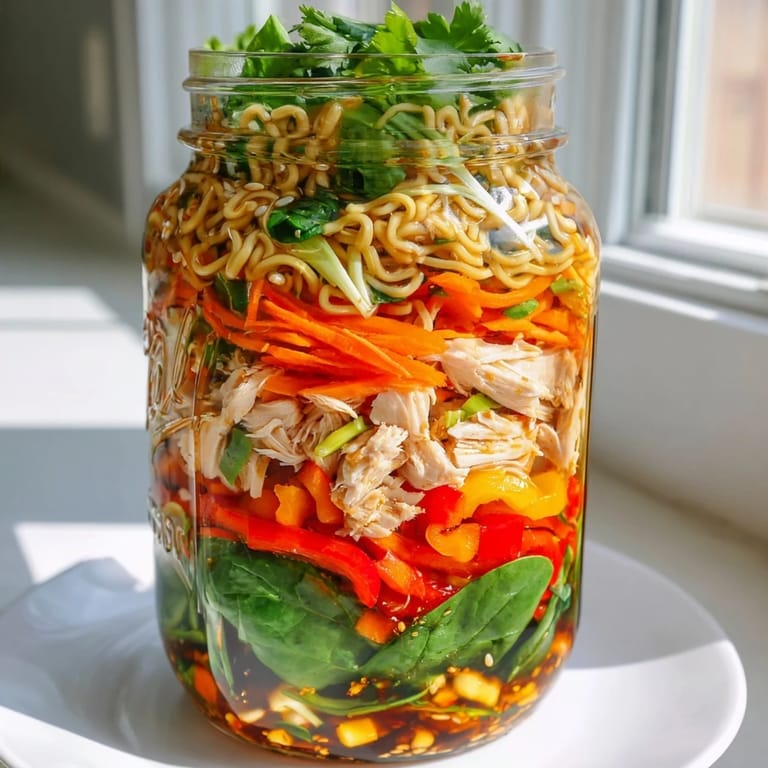
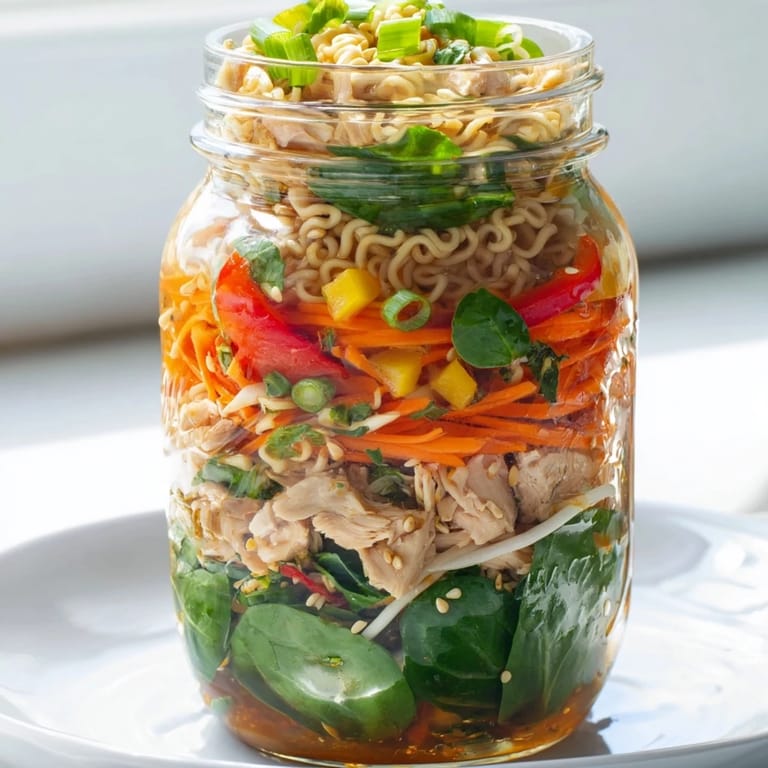
- Layer the protein:
- Spoon your diced protein directly onto the sauce in each jar. It will marinate as the jar sits in the fridge, soaking up all those flavors.
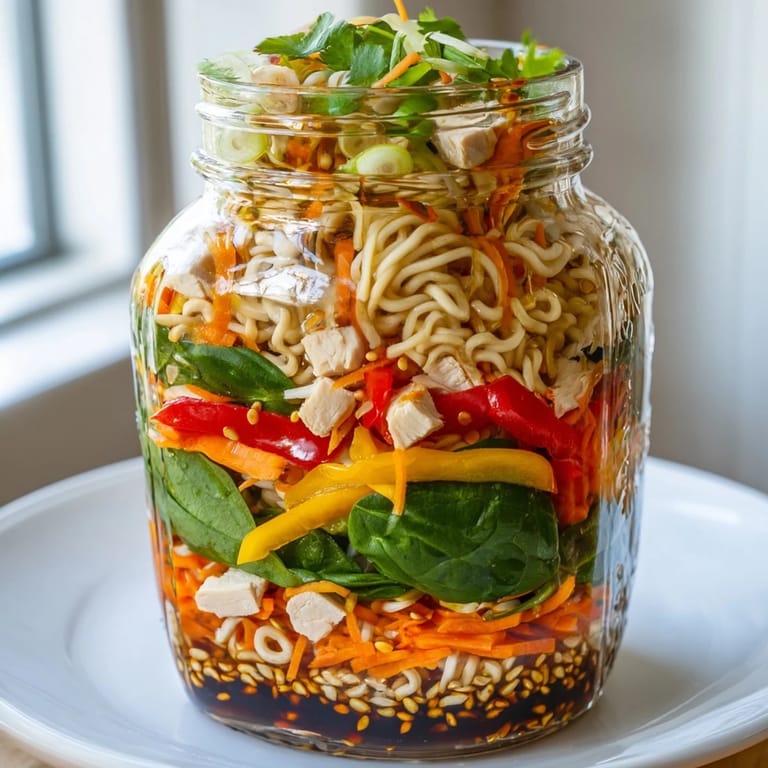
- Add vegetables in order:
- Layer carrots first, then bell peppers, then leafy greens, then scallions and bean sprouts. This arrangement keeps the more delicate vegetables away from the wet sauce at the bottom.
- Top with noodles:
- Add the cooled noodles as your final layer, packing them down gently so the lid closes easily. The noodles create a seal that actually helps keep everything fresh below.
- Seal and refrigerate:
- Screw the lids on tight and refrigerate until you're ready to eat. These will keep for up to four days, though the vegetables stay crispest in the first two days.
- Prepare to eat:
- When hunger strikes, remove the lid and add any toppings you want—cilantro, nuts, sesame seeds, and a squeeze of lime. Pour about half a cup of hot water into the jar and let it sit for two to three minutes, which softens the noodles and warms everything through without turning it mushy.
 Save
Save My grandmother tasted one of these jars and called it genius, which is high praise from someone who still cooks full dinners every single night. She said it reminded her of the lunch boxes she packed for my grandfather decades ago—layers of care, everything thoughtfully arranged, designed to hold up through the day. I love that something so modern somehow carries that same spirit of planning ahead to feed someone you care about.
Why This Method Actually Works
The beauty of the mason jar setup is that each layer serves a purpose beyond just fitting in the container. The sauce sits at the bottom where it can't make the noodles soggy, it seasons the protein above it, and it seals the vegetables in a protective microclimate. The vegetables stay arranged horizontally so they don't crush each other, and the noodles on top act like a lid that keeps everything fresher longer. It's basically a edible architecture problem that's been solved perfectly.
Customizing Your Jars
The ingredient list I've given you is a starting point, not a boundary. I've made versions with spiralized zucchini instead of noodles, substituted edamame for the protein, added cucumber slices for extra crunch, and swapped cilantro for mint when I had it on hand. The sauce formula stays the same—soy, vinegar, sesame oil, honey, and heat—because that combination works with almost everything. Once you understand the layering logic, you can improvise endlessly based on what your kitchen holds and what your taste buds are craving.
Storage and Meal Prep Strategy
I prep these jars on Sunday afternoon while listening to podcasts, and having four ready meals in the fridge transforms my weekday existence. The key is prepping your components separately—cooked protein in one container, sauce in another, vegetables washed and sliced, noodles cooked—then doing the assembly line layering all at once. You'll spend maybe twenty minutes total, and then breakfast anxiety disappears for four days. If you want them to last longer, skip the bean sprouts until serving time, because they're the first thing to wilt.
- Prep on your least busy cooking day and you've basically outsourced your lunches.
- Keep extra sauce mixed and stored separately so you can assemble replacement jars mid-week if needed.
- Label your jars with the date using a piece of tape—it sounds like overthinking until day four when you're grateful you did.
 Save
Save These jars became more than just efficient meal prep once I realized they're perfect for bringing meals to friends who are overwhelmed, sending lunches with my partner for long days, or gifting to someone who genuinely needs one less thing to think about. There's something generous about a carefully layered jar of good food.
Recipe FAQ
- → How do I prepare the noodles for this meal?
Cook according to package directions, then drain and rinse under cold water to stop cooking and prevent sticking.
- → What proteins work best in this meal?
Diced cooked chicken, tofu, shrimp, or edamame work well depending on your preference.
- → Can I make this meal vegetarian or vegan?
Yes, using tofu or edamame and substituting honey with maple syrup keeps it plant-based.
- → How long can the jarred meals be stored?
They keep well in the refrigerator for up to 4 days when sealed tightly.
- → How do I serve the layered noodles from the jar?
Remove the lid, add toppings if desired, pour in hot water, let sit 2-3 minutes to soften, then stir before eating.
- → Can I adjust the heat level of the sauce?
Yes, add or omit Sriracha or chili sauce depending on your spice preference.