 Save
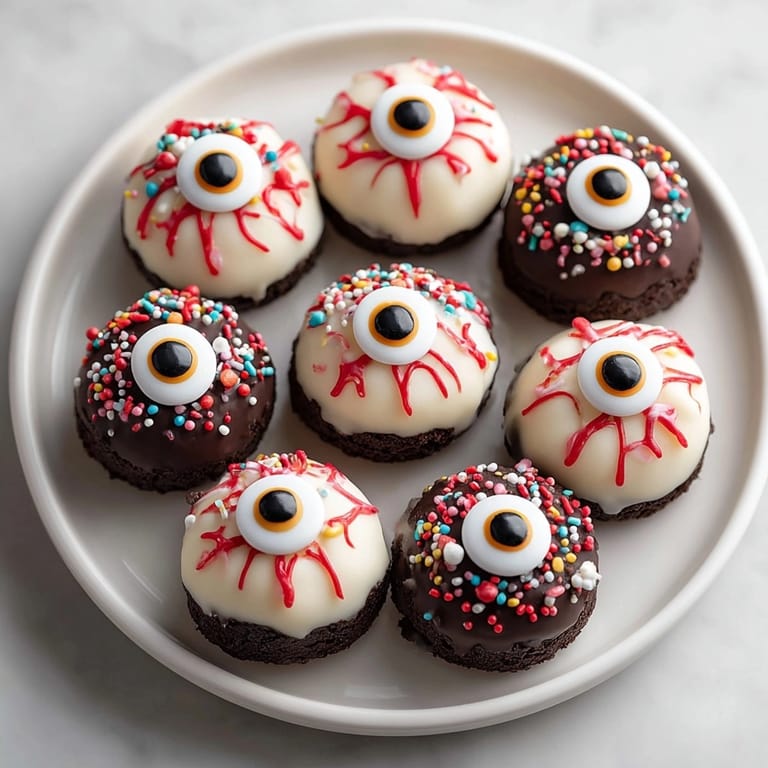
Save Monster Donut Hole Eyeballs are my go-to treat every October when the house brims with Halloween excitement. These cute bite-size snacks transform ordinary donut holes into creepy-cool monster eyeballs using easy-to-find sweets and a splash of creativity. They are visually striking on a party table and vanish fast every time I serve them.
My kids call these monster bites and compete for who can make the wildest eyeball design. The first time I made them we wanted a quick treat for a spooky movie night and now they are a family tradition.
Ingredients
- Donut holes: plain donut holes create the ideal base for your edible monster eyeballs try to pick fresh and soft ones for best results
- White candy melts or white chocolate chips: coats the donut holes in a dramatic monster eye shade look for high-quality melts for a smooth finish
- Candy-coated chocolate candies: these form the iris letting you use playful colors for each eyeball go for established brands as they stay crisp and vibrant
- Mini chocolate chips: creates a realistic pupil choose dark baking chips for best contrast
- Red gel icing: mimics bloodshot veins opt for a fine-tipped tube for more precise detail
- Coconut oil: thins the chocolate if needed helps achieve the right dipping consistency use refined coconut oil for a neutral flavor
- Sprinkles or colored sugars: adds extra monster flair pick bold and bright toppings to make each eyeball pop
Tired of Takeout? 🥡
Get 10 meals you can make faster than delivery arrives. Seriously.
One email. No spam. Unsubscribe anytime.
Instructions
- Prepare the Tray:
- Line a baking sheet with parchment paper and make sure the surface is completely flat. This prevents sticking and makes cleanup easy after decorating.
- Melt the Candy Coating:
- Put the white candy melts or chocolate chips in a microwave-safe bowl. Heat in short 30-second bursts stirring after each until silky smooth. For easier dipping add a spoonful of coconut oil and stir well for perfect texture.
- Dip the Donuts:
- Use a fork or dipping tool to submerge each donut hole in the melted coating. Gently roll until covered. Let excess drip off then transfer to your lined tray so the coating sets evenly with no puddles.
- Add the Iris and Pupil:
- Before the coating hardens press a candy-coated chocolate into the center of each donut hole. Immediately place a mini chocolate chip onto the candy so it sticks as the pupil making the eye complete.
- Set the Eyeballs:
- Allow the donut holes to rest at room temperature or pop them into the fridge for ten minutes. This hardens the coating making them easier to handle and decorate further.
- Create the Veins:
- Once the coating is set use a piping bag or icing tube filled with red gel to draw thin squiggly lines outward from each iris. Vary the squiggles for a truly monster look this is where kids love to get creative.
- Decorate Further:
- Top each eyeball with sprinkles or colored sugars if desired. Mix up patterns and colors for extra personality making your monster tray truly dynamic.
- Serve:
- Arrange the finished donut hole eyeballs on a platter. Surround them with more Halloween sweets or fun props for that over-the-top spooky effect.
 Save
Save The red gel icing is my favorite ingredient it transforms each donut hole into a dramatic monster eye and always gets gasps from my guests. Last Halloween everyone wanted to add their own squiggles which made the decorating table as lively as the treat itself.
Storage Tips
Store completed eyeballs in a single layer inside an airtight container. Avoid stacking as that can squish the decorations. Keep at room temperature for best texture and serve within two days for peak freshness. If you need to prep ahead decorate the day you plan to serve for ideal results.
Ingredient Substitutions
Use gluten-free donut holes if you need allergy-friendly treats. Swap white candy melts for dairy-free chocolate options. If red gel icing isn’t available try thin lines of raspberry jam or red colored sugar instead. Candy eyes work just as well in place of the chocolate candies for a different effect.
Serving Suggestions
Pile donut hole eyeballs high on a black or neon platter for monster drama. Scatter plastic spiders or candy bones around for a playful Halloween vibe. For a dessert spread arrange with other small treats like gummy worms or ghost marshmallows. Themed napkins and orange cups make the scene even more festive.
Cultural and Historical Fun
Decorated donut holes capture the playful spirit of Halloween snacks in America. They are a modern take on party finger foods blending nostalgia and fun. The eyeball motif taps classic Halloween themes making them a hit at community gatherings and school parties every fall.
Seasonal Adaptations
Swap white coating for green or blue if you want alien eyeballs in spring or summer Make red velvet donut eyeballs for a Valentine’s monster party Add mint extract to coating for a frosty winter monster theme
Success Stories
Last year I brought these monster eyeballs to a classroom Halloween party and kids immediately gathered around comparing designs and colors. Parents asked for the recipe and now it’s a must for school events. Even shy decorators get excited about making their own monsters.
Freezer Meal Conversion
While fresh donut holes are best you can freeze undipped donut holes for up to a month. Thaw overnight before dipping and decorating so the coating sets properly. Once decorated do not freeze as the candy coating and gel icing may turn sticky.
 Save
Save A monster party feels incomplete without these donut hole eyeballs. Watching kids invent new designs is pure Halloween fun year after year.
Recipe FAQ
- → How do I ensure a smooth candy coating?
Melt candy melts or white chocolate gently, stirring often. Add coconut oil for a thinner, glossy finish if needed.
- → Can I use homemade donut holes?
Yes, homemade or store-bought donut holes work. Ensure they're plain and cooled before decorating.
- → How to store decorated donut holes?
Keep in an airtight container at room temperature for up to 2 days. Best enjoyed fresh for texture.
- → How do I create different monster looks?
Use colored candy melts, sprinkles, or edible candy eyes. Vary icing colors for unique designs.
- → Are there allergen concerns with these treats?
Check ingredients for wheat, dairy, soy, and nut traces. Candy and donut brands vary, so always review labels.
- → What’s the best way to apply gel icing?
Use a small piping bag or tube for precise lines, creating realistic veins and vibrant effects on each eyeball.