 Save
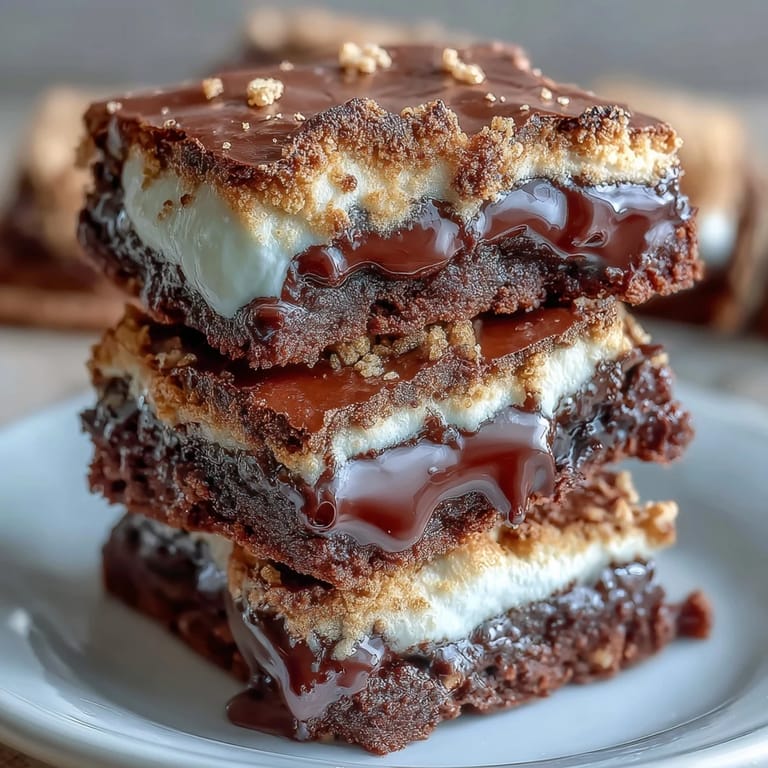
Save My kitchen smells like campfire without the smoke whenever I pull these s'mores brownie cookies out of the oven. There's something magical about that moment when you watch a marshmallow puff up and turn golden, transforming a simple brownie cookie into something that tastes like summer nostalgia but requires zero tent stakes. The first time I made them, I honestly wasn't sure if pressing a marshmallow onto a hot cookie would work, but that soft, melty center against the fudgy brownie base converted me immediately. Now they're the dessert I reach for when I want something that looks more impressive than the fifteen minutes it actually takes.
I brought a batch to my neighbor's book club last spring, and I watched someone who claimed to hate marshmallows eat three in a row while insisting they were an exception to the rule. What caught me off guard was how the marshmallow actually makes sense here instead of feeling gimmicky, because the brownie base is rich enough to handle it. That night I realized this recipe works because it's not trying to be something it's not—it's just genuinely good, unapologetic dessert.
Ingredients
- 1 box (18–20 oz) brownie mix: Using a quality mix here matters more than you'd think, since this is the foundation—I've learned that cheaper versions sometimes bake up too cakey, so splurge slightly if you can.
- 2 large eggs: These bind everything together, so don't skip them or try to substitute unless you know what you're doing.
- 1/3 cup vegetable oil: This keeps the cookies tender and chewy rather than cake-like, which is the whole point.
- 1 tablespoon water: Just enough moisture to bring the dough together without making it wet.
- 1/2 cup semi-sweet chocolate chips: These add pockets of extra chocolate that make each bite more interesting than the base mix alone.
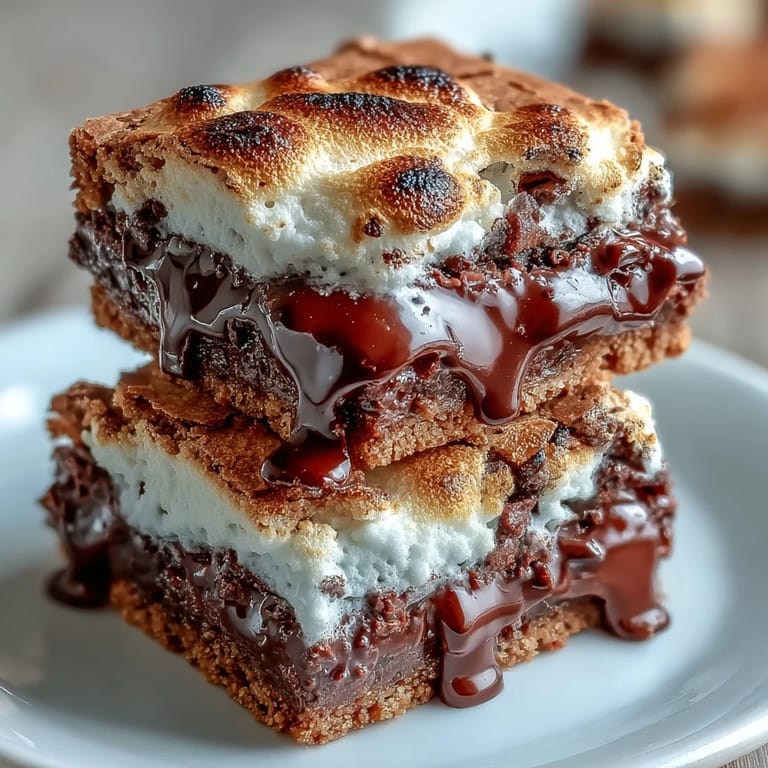
- 1/2 cup crushed graham crackers (about 4 sheets): The secret ingredient that ties the whole s'mores concept together—crush them by hand into varied sizes for texture.
- 18 large marshmallows (one per cookie): Buy the good ones if possible, since cheaper marshmallows sometimes deflate instead of puff.
- 1/4 cup mini chocolate chips (optional, for garnish): These stick to the warm marshmallow and look intentional instead of accidental.
- 1/4 cup additional crushed graham crackers (optional, for garnish): A finishing touch that reinforces the flavor and makes them look bakery-worthy.
Tired of Takeout? 🥡
Get 10 meals you can make faster than delivery arrives. Seriously.
One email. No spam. Unsubscribe anytime.
Instructions
- Get your oven ready and set the stage:
- Preheat to 350°F and line two baking sheets with parchment paper so your cookies won't stick and cleanup stays minimal. This step only takes two minutes but saves you from frustration later.
- Mix the brownie base until just combined:
- Pour the brownie mix, eggs, oil, and water into a large bowl and stir until the dry streaks disappear—don't overmix or your cookies will be tough. You're looking for a texture that's uniform but still slightly thick.
- Fold in the chocolate and graham cracker bits:
- Gently stir in the chocolate chips and crushed graham crackers, keeping the motion slow so you don't deflate any air you've worked in. The dough should look studded and interesting.
- Scoop and space your cookies:
- Drop heaping tablespoons of dough onto the prepared sheets, leaving about two inches between each one because these puff slightly. You should get right around eighteen cookies if you're generous with your scoops.
- Bake until set but still soft:
- Bake for 8–9 minutes—the edges should look set while the centers still feel slightly underdone when you touch them gently. This timing is crucial because you're about to add marshmallows.
- Add your marshmallows while cookies are warm:
- Pull the cookies from the oven and immediately press one large marshmallow onto the center of each one, pressing down gently so it makes contact with the warm surface. The residual heat will start softening it right away.
- Give the marshmallows a quick kiss in the oven:
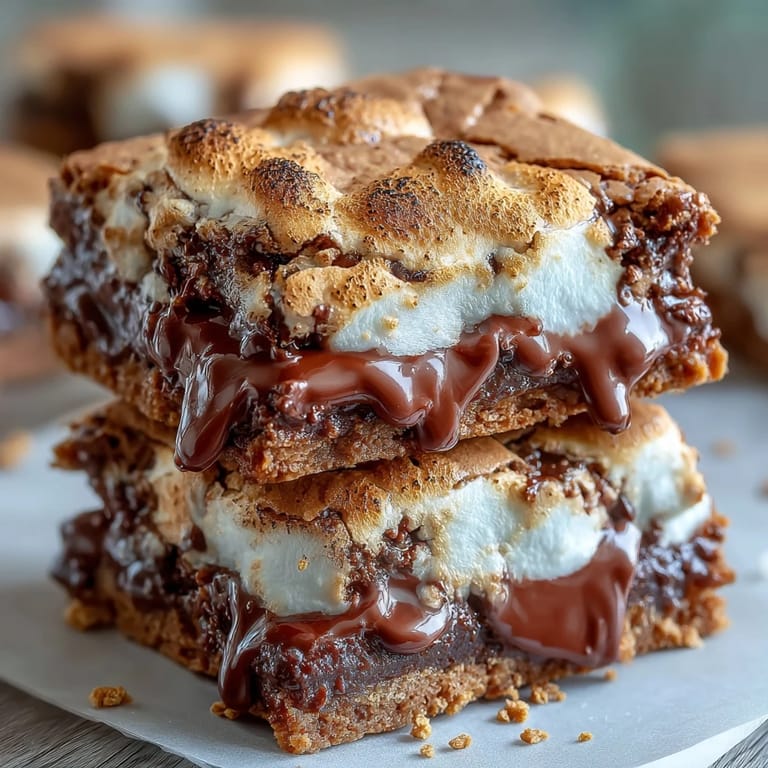
- Return the entire pan to the oven for 1–2 minutes, watching closely until the marshmallows puff up and their edges just start to turn translucent. You'll see the transformation happen in real time.
- Toast the tops if you're feeling fancy:
- If you want that campfire effect, switch your oven to broil and move the pan to the top rack for about 30 seconds, keeping your eyes on them the entire time because they can go from golden to burned in a heartbeat. A kitchen torch works even better if you have one and don't mind a few extra minutes.
- Finish with toppings and cool:
- Immediately sprinkle mini chocolate chips and extra graham cracker crumbs over the warm marshmallows so they stick, then let the cookies cool on the baking sheets for five minutes before moving them to a wire rack. They'll continue to set as they cool.
 Save
Save There was a moment last summer when my young cousin bit into one of these and declared it the best thing she'd ever eaten, then immediately asked if she could help make the next batch. Watching someone that age understand why adults get excited about the intersection of fudgy brownie and melted marshmallow felt like passing down some kind of essential knowledge. That's when I knew this recipe had crossed from being just easy into being actually meaningful.
Why Marshmallows Matter Here
The marshmallow isn't just sitting on top looking pretty—it's fundamentally changing the experience of eating these cookies. When you bite through that slightly crispy exterior into the soft, gooey center, it creates this textural contrast that your brain finds deeply satisfying. The marshmallow also brings sweetness that feels indulgent without tasting artificial, which is harder to achieve than it sounds.
The Graham Cracker Secret
I used to make brownie cookies that were technically good but felt incomplete somehow, until I started crushing graham crackers into the dough. The moment those nutty, slightly salty crumbs hit the mix, everything clicked into place. They add texture, flavor depth, and they tie the whole s'mores concept together without needing you to announce it.
Storage and Make-Ahead Wisdom
These cookies keep surprisingly well if you store them properly, staying chewy for days if they're protected from air. I've learned to layer them with parchment paper in an airtight container so they don't stick to each other and lose their marshmallow topping. If you're making them for an event, you can bake and cool them completely, then store them in the fridge and let them come to room temperature before serving.
- Keep them in an airtight container on the counter for up to three days, and they'll stay soft and marshmallowy instead of hardening.
- If you want to make the dough ahead, scoop it onto baking sheets and freeze before baking, then add about two extra minutes to the initial bake time when baking from frozen.
- The moment between pulling them from the broiler and toppings settling is brief but perfect, so have your chocolate chips and graham crumbs ready to go before you start baking.
 Save
Save Making these cookies has become one of those kitchen rituals that takes almost no time but feels completely worth it, the kind of thing you do when you want to turn an ordinary afternoon into something memorable. They're proof that you don't need hours or complicated techniques to make something that tastes genuinely special.
Recipe FAQ
- → How do I prevent marshmallows from burning?
Watch closely during the broil step, broiling for just 30 seconds. Alternatively, use a kitchen torch to toast them evenly without overcooking.
- → Can I use dark chocolate chips instead?
Yes, dark chocolate chips add a richer flavor that complements the sweet marshmallow and crunchy graham crackers nicely.
- → Is it better to cool cookies before topping?
For best results, top marshmallows immediately after baking so they melt and puff nicely. Cooling afterward prevents them from collapsing too fast.
- → How should these cookies be stored?
Store in an airtight container at room temperature for up to 3 days to maintain freshness and softness.
- → Can I prepare the dough ahead of time?
Yes, you can prepare the dough and refrigerate it for up to 24 hours before baking to enhance flavors and manage timing.